
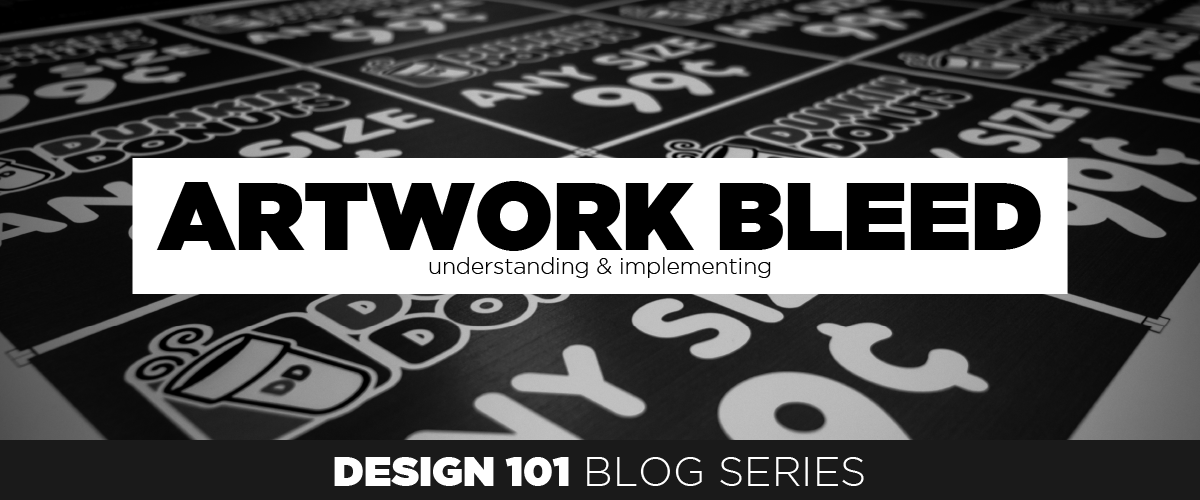
Are you familiar with the term “artwork bleed” but not sure that that implies? This is the first post in an ongoing series we are calling “Design 101” that will cover a variety of tricks and concepts common to graphic design and setting up signs for print. Today we are discussing the concept of artwork bleed when designing for print.
In it’s most basic sense artwork bleed is extending the artwork past the cut line (final sign size) so that your artwork will be printed edge to edge with no blank space on any sides. A printer is a very precise piece of equipment, but it is not perfect and cannot print perfectly edge to edge. We also have to account for slight movements of the material being printed on, design inconsistencies, material inconsistencies and other things such as reversing the material for double sided print. Things like these will make an edge to edge printing impossible and so the answer is to add extra design that will be trimmed down.

The idea and implementation are both very simple. All you need to do is design your art file larger then the final sign size and the printer will trim off the excess design leaving an edge to edge print! But how much bleed do I need you might be asking? Larger signs need more bleed because as they get larger there is more room for inconsistencies in the material and handling of the material. For most signs with edges under 2 feet an 1/8 bleed on all sides is perfect. What this means is when creating your artwork you want to make your artboard size a quarter inch larger then you need the final sign size.
Let’s say you are running for office and you want to put 24″ x 18″ yard signs all over town…. you would create your artwork at 24.25 x 18.25″. The signs would be printed at this size and be trimmed down to 24″ x 18″ and trimming off the 1/8… or .125 design on all sides! And now your the city drain commissioner because your signs looked so good!
A good rule of thumb is as follows:
- Sign with all edges under 24″ inches add a .125 bleed on all sides
- Sign with 1 or more edges over 24″ add a .25 bleed on all sides
- Sign with 1 or more edges over 6′ add a .5 bleed on all sides
- Sign with 1 or more edges over 8′ add a 1 inch bleed on all sides
Obviously every sign is different but the above chart is a good reference guide. When in doubt always move to the larger bleed size as the access can always be cropped or trimmed out by the production team.
Lastly, another golden rule is to leave a safe zone the same size as your bleed where you do not have any critical elements that you do not want to be in the trim zone. By leaving text and other elements out of this area it ensures that any inconsistencies in the printing/cutting process will not ruin the sign. Having elements to close to the edge of the sign usually do not look very professional anyways. This does not apply to elements that were design to be off the edge of the trimmed sign.
If you are a visual learner check out the video below for a tutorial on setting up artwork bleed and crop marks using adobe Photoshop! We have a whole youtube series dedicated to graphic design tips, tricks and tutorials.
Here at Wilde Signs we set the bar high by offering our customers superior quality at a competitive price, paired with fast delivery.
Custom sign projects & manufacturing is our specialty. Don’t be overwhelmed by creating a solution on your own. Pass your projects off to us and we will see it through to outstanding results–beginning to end.
The Wilde Signs Promise You will receive an end product that you are happy with or we will make it right.
Leave A Comment